A dull circular saw blade can cause slower cuts, burn marks, rough edges, and extra strain on the saw. In many cases, however, the blade does not need to be replaced. Learning how to sharpen circular saw blades correctly can restore cutting performance and extend blade life.
That said, sharpening is not simply a matter of grinding down the teeth. Carbide-tipped blades require consistent angles, light material removal, and careful heat control. Small mistakes can affect cut quality or even damage the blade.
This guide explains how to sharpen a circular saw blade step by step, the tools you’ll need, and the common mistakes to avoid.
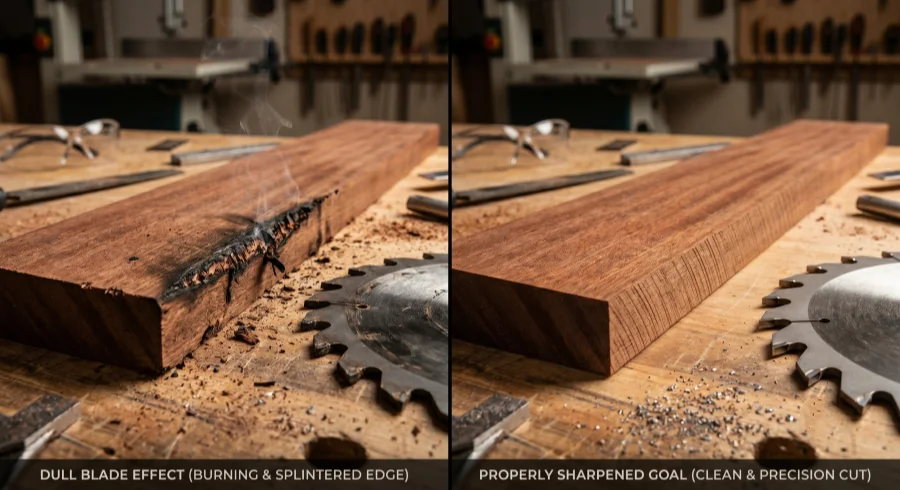
Table of Contents
- Quick Answer: How to Sharpen a Circular Saw Blade
- What Tools Do You Need to Sharpen a Circular Saw Blade?
- How to Sharpen a Circular Saw Blade
- Bad Practices That Can Damage Your Blade
- FAQs
- Conclusion
Quick Answer: How to Sharpen a Circular Saw Blade
- Clean the blade to remove resin and debris
- Inspect for cracks, damage, or warping
- Secure the blade in a vise or clamp
- Match the original factory tooth angle
- Sharpen each tooth evenly with a diamond file
- Avoid overheating carbide tips during sharpening
- Test the blade on scrap wood before use
What Tools Do You Need to Sharpen a Circular Saw Blade?
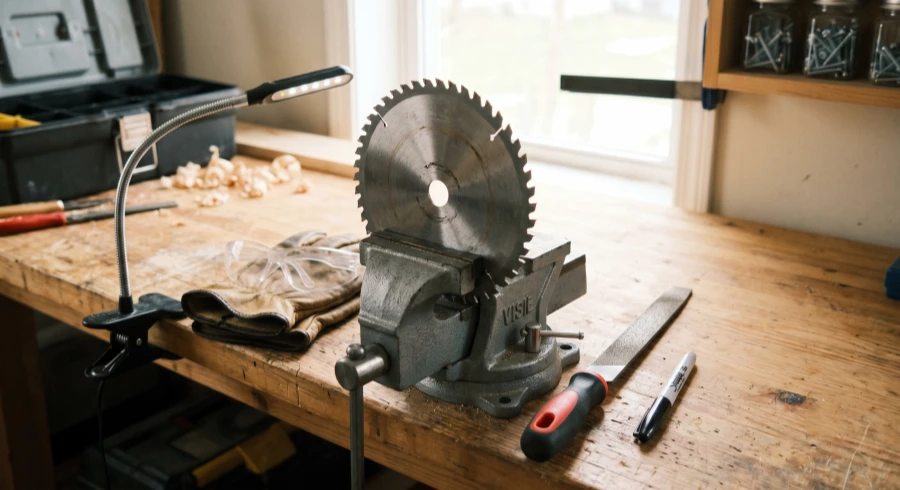
You do not need a professional sharpening station to sharpen a circular saw blade. For carbide-tipped blades, a diamond file is the most important tool because standard steel files have little effect on carbide and wear out quickly. A vise or blade clamp helps keep the blade stable while sharpening. Beyond that, a marker, safety glasses, gloves, and good lighting are usually all you need.
Many DIY sharpening mistakes begin with the wrong file or poor technique. Carbide is extremely hard but also brittle. Using an unsuitable file or applying uneven pressure can gradually alter the tooth shape, causing rough cuts, blade drift, or poor cutting performance.
Automatic blade sharpeners can remove material quickly, but they also increase the risk of overheating or removing too much carbide. Hand sharpening takes longer, but it offers greater control and makes it easier to maintain consistent tooth geometry.
How to Sharpen a Circular Saw Blade
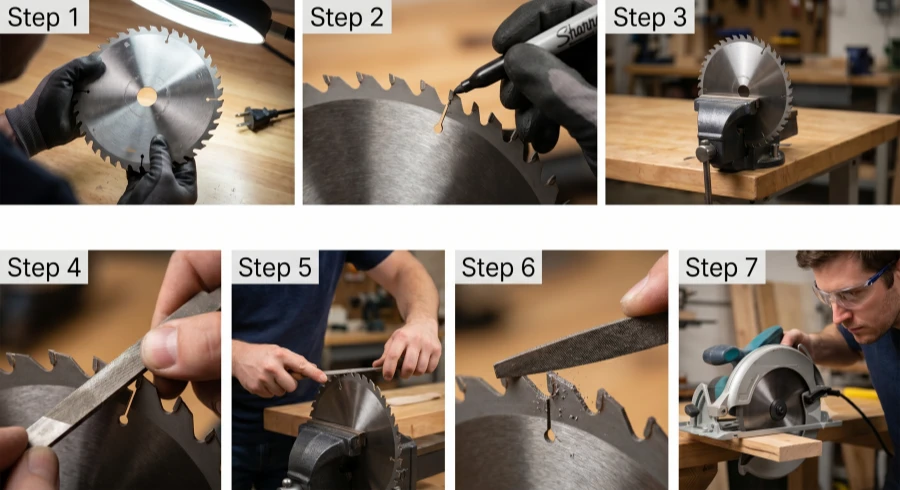
Step 1: Remove and Inspect the Blade
For safety reasons, make sure to unplug the saw before starting. Most accidents occur during maintenance rather than cutting. Take time to thoroughly inspect the blade. Shine a light on it and look for small chips on the teeth, which are usually safe to sharpen. However, cracks in the blade plate, bent teeth, or visible wobble are signs that the blade should be replaced rather than sharpened. If the blade appears warped or damaged, do not attempt to sharpen it.
Step 2: Mark Your Starting Tooth
Use a marker to mark one tooth before you begin sharpening. This simple step prevents you from sharpening the same tooth twice or accidentally skipping teeth. Once you lose track of your starting point, maintaining consistent sharpening across the blade becomes much more difficult.
Step 3: Secure the Blade in a Vise
Secure the blade firmly in a vise or blade holder before sharpening. You want absolutely no movement while filing. Even slight movement can change the sharpening angle without you realizing it. This is where uneven sharpening often begins. A poorly sharpened blade may cut rough, vibrate more, or wander during long rip cuts.
Step 4: Match the Original Tooth Angle
When sharpening, avoid trying to reshape the teeth or change their original profile. Match the factory tooth angle as closely as possible. Different types of circular saw blades are designed with specific tooth geometry for specific cutting tasks, so even small angle changes can noticeably affect cut quality and tracking.
Step 5: Sharpen Each Tooth Evenly
Use the same number of strokes on each tooth. Apply consistent pressure and remove only a small amount of material with each pass. Rushing this step often leads to uneven teeth and poor cutting performance. Taking your time helps keep tooth heights more uniform and usually results in smoother, straighter cuts.
Step 6: Avoid Overheating the Teeth
Excessive heat can damage the cutting edge and shorten the life of carbide teeth. Work slowly and remove only small amounts of material with each pass. Whether using a diamond file or any motorized sharpening tool, holding it against one tooth for too long can overheat the edge and reduce cutting performance. When sharpening carbide blades, patience is far more important than speed.
Step 7: Test the Blade on Scrap Wood
Run the sharpened blade through a piece of scrap wood before using it on a project. Pay attention to how the saw feels and sounds during the cut. A properly sharpened blade should cut smoothly with minimal effort. There should be no excessive vibration, burning smell, or significant tear-out along the cut edge.
Bad Practices That Can Damage Your Blade
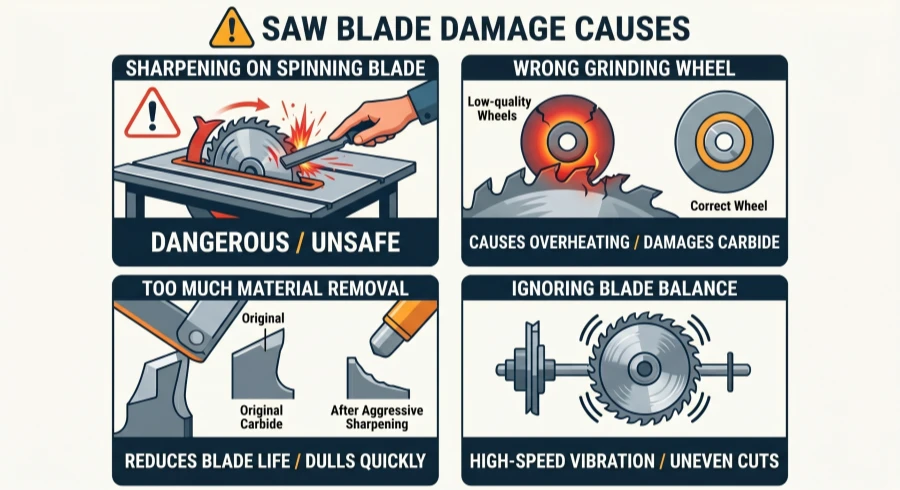
Sharpening a Circular Saw Blade Against a Spinning Blade
Some online “sharpen in 30 seconds” methods involve pressing a tool against a rotating blade. This approach is unsafe and often leads to uneven sharpening due to excessive pressure and lack of control. It can also result in a blade that cuts unpredictably or becomes more aggressive than intended.
Choosing the Wrong Grinding Wheel
Using an inappropriate grinding wheel can generate excessive heat and damage carbide teeth. Low-quality wheels may overheat the cutting edge quickly or cause small chips during sharpening. In some cases, blade performance will gradually decline, leading to burn marks, splintering, or rough cuts.
Removing Too Much Material
Removing too much carbide during sharpening reduces blade life significantly. Each pass removes material that cannot be restored, and over-sharpening can quickly dull the teeth. The goal of sharpening is to restore the cutting edge, not reshape the blade aggressively.
Ignoring Blade Balance
Circular saw blades rotate at very high speeds, so balance is critical. If one side is sharpened more than the other, the blade may vibrate during use, produce uneven cuts, and place additional strain on the saw motor. In severe cases, it may also create a wobbling sensation during operation.
FAQs
Can you sharpen carbide circular saw blades at home?
Yes, but carbide does not tolerate mistakes. It requires diamond abrasives, consistent sharpening angles, and careful heat control. Even small errors can chip the carbide tips or reduce cutting performance.
Why does a circular saw blade burn wood after sharpening?
This usually happens when the teeth are sharpened unevenly, the blade still has resin buildup, or the feed rate is too slow. Excess friction generates heat, which leads to burn marks during cutting.
How many times can carbide saw blades be sharpened?
It depends on blade quality and tooth size. High-quality carbide blades can typically be sharpened several times, as long as only a small amount of material is removed each time.
What happens if a circular saw blade is sharpened incorrectly?
Incorrect sharpening can cause uneven cutting, increased vibration, poor tracking, and in some cases kickback. Improper tooth geometry or inconsistent angles can cause the blade to catch the material during use.
Conclusion
Sharpening a circular saw blade is less about forcing results and more about careful, controlled work. The key factors are maintaining consistent angles, removing material evenly, and preventing heat buildup during sharpening.
Carbide-tipped blades require extra care because they are more sensitive to mistakes than steel blades. For this reason, many users choose professional sharpening for expensive or high-performance blades.
If a blade is warped, cracked, or missing teeth, it is no longer a good candidate for sharpening and should be replaced instead of repaired.